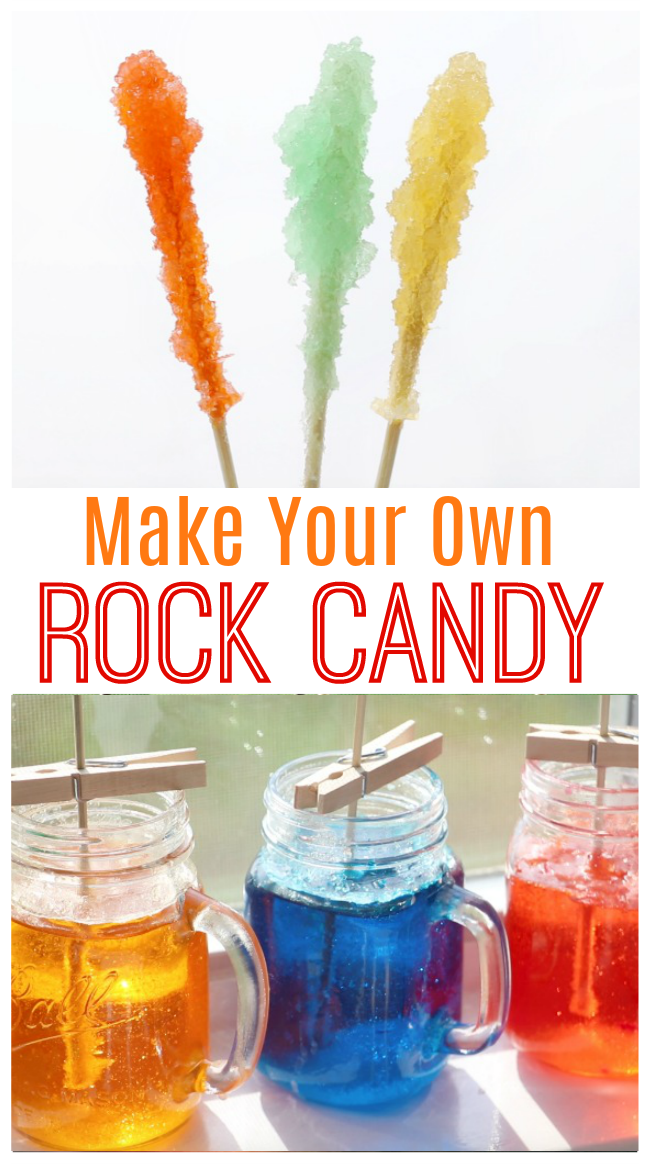
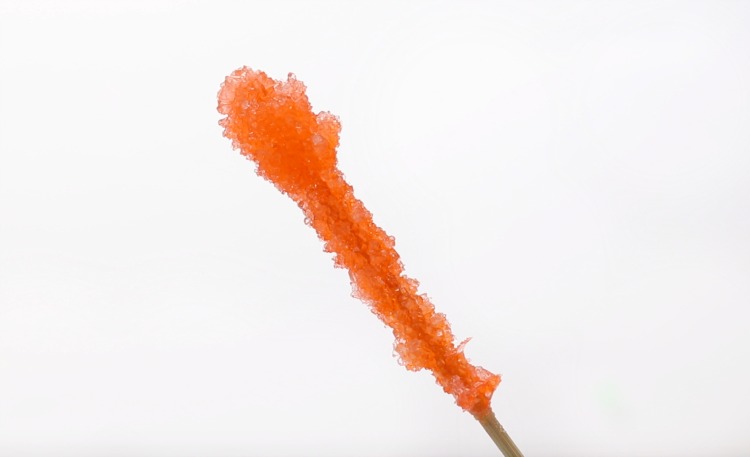
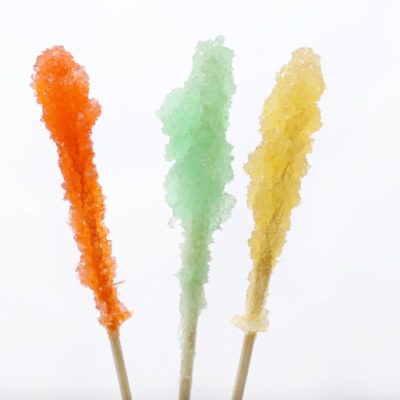
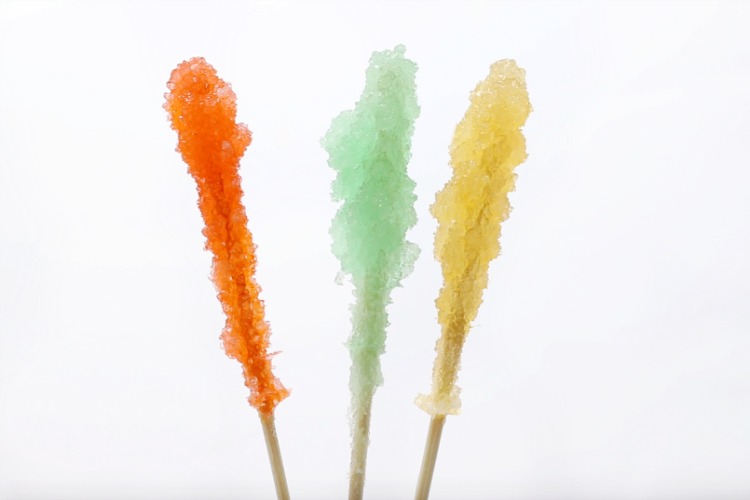
Make homemade rock candy with these tips and tricks and answers to frequently asked questions. A fun science experiment and treat for kids! Rock candy takes 5-7 days to grow, but the process is fun to watch!
Looking for more science experiments for kids? Check out our collection of easy science experiments using household ingredients!
Watch our step by step video!
Homemade Rock Candy is easy to make, it just takes patience.
There are so many variations using string, sticks, etc. It’s a beautiful science project and sweet treat all in one. It does take time, and the end results can vary. There’s a science to it and that’s all part of the fun! Just know this… YOU NEED A WHOLE LOT OF SUGAR. A LOT. You can start with a 1:2 water/sugar ratio, but we’ve had better luck just shy of a 1:3 water sugar ratio. So if you have 4 cups of water, you’ll need between about 10 cups of sugar to make the perfect sugar syrup.
Scroll to the bottom for some frequently asked questions for making rock candy.
How to Make Rock Candy on a Stick
Homemade Rock Candy Recipe
Equipment
- funnel
- glass jars
- clothespins
- large pot
Ingredients
- Sugar lots of sugar
- Water
- Food Coloring concentrated for brighter colors
- Wooden Candy Sticks or Bamboo Skewers
- flavoring optional
Instructions
- Trim down your skewers to a reasonable size to fit in whatever jars or cups that you will be using. You'll also want to get rid of the point. Dip them in water, then roll in sugar.
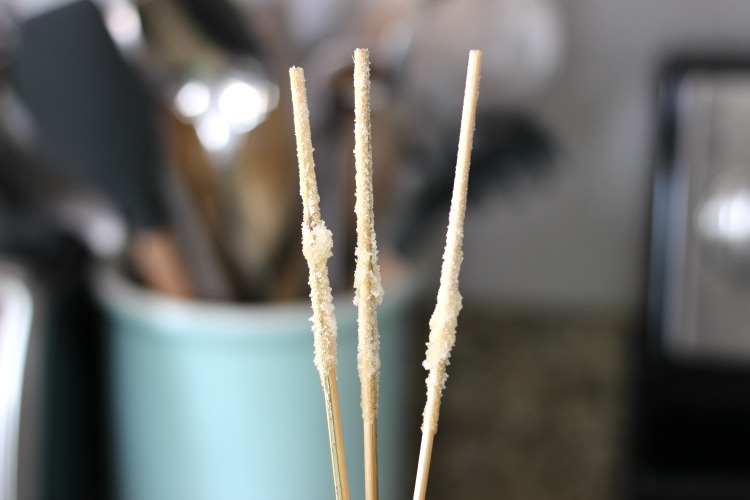
- Let the sticks dry completely and set aside. This will give the sugar a base (something to stick to when it starts to crystallize).
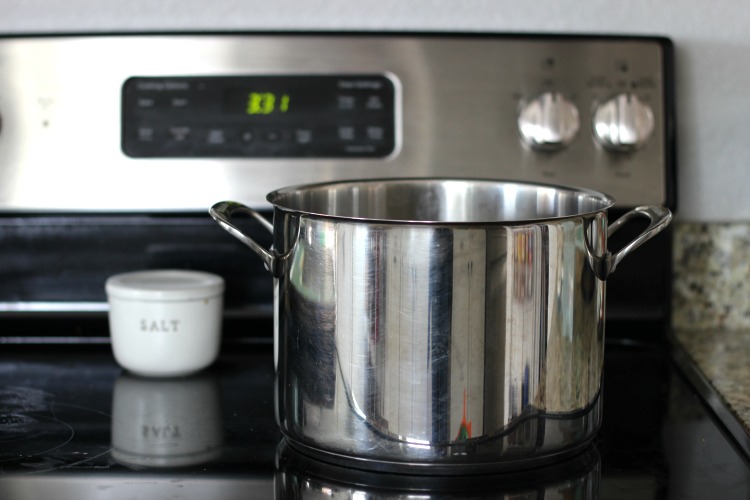
- Heat water on medium-high heat. When it starts to simmer/boil begin adding sugar until you reach a 1:2 to just shy of a 1:3 water sugar ratio. The mixture will take longer to dissolve the more sugar you add (totally normal). Keep stirring with a wooden spoon until completely dissolved. Remove from heat. CAUTION: it is very HOT!
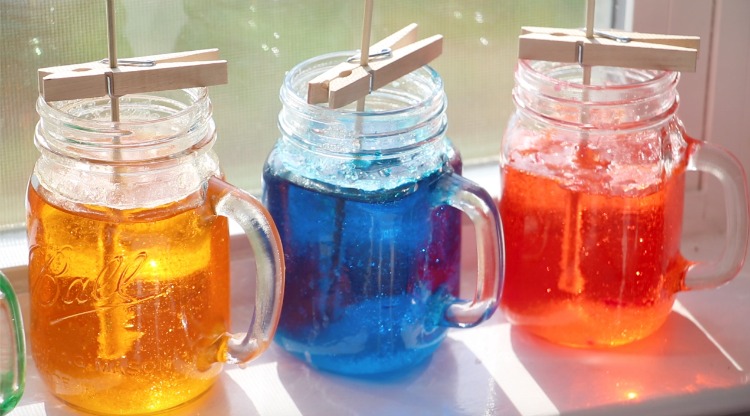
- Ladle the syrup into your jars using a funnel to catch spills. Add food coloring and flavorings to each jar, if you’d like wouldn't grape, cherry, orange or lemon flavoring be delicious?).
- Allow the syrup in the mason jars to cool down a bit. Warm or room temperature. Attach a clothespin to each skewer (the ones you dipped in sugar and let dry) and place in the jar.
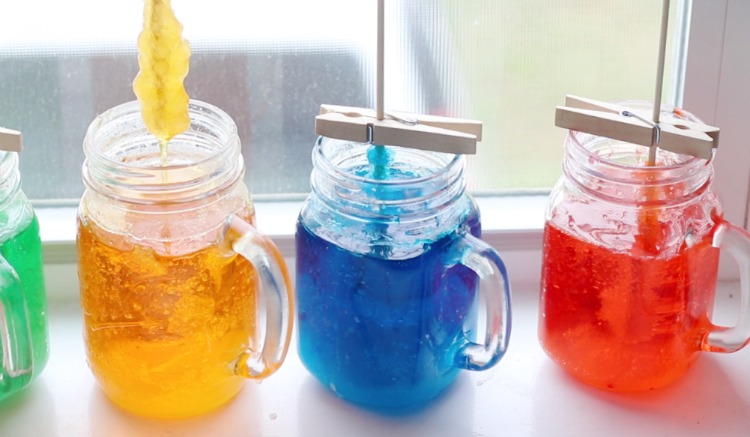
- Place your jars in a safe location and watch the crystals grow!
Notes
- You can create as much or as little syrup as you'd like as long as you keep the same sugar/water ratio. You are making a nice, sticky, sugary syrup.
- If after 24 hours you don't see any crystal growth, pour each jar of syrup back into the pan (separately) and add more sugar. 1/4 c. or so and heat once more until it is a syrup consistency. Roll the sticky skewers in sugar and add once more to the jar after the syrup has cooled down to be warm (not hot) or room temperature.
- Make sure the skewer isn't touching the bottom or sides of jar/glass. They need room to grow. One skewer per jar works best for regular sized jars.
Nutrition
Frequently Asked Questions:
Can you make more than one stick of rock candy in each jar?
How do you drain the rock candy?
How long will rock candy last?
The shelf life for rock candy, if kept in a dry location, is 1 year.
Can I use a disposable foam cup for making rock candy?
Why didn’t my rock candy grow crystals?
If crystals don’t grow it is almost always due to lack of sugar.
If after 24 hours you don’t see any crystal growth, pour the syrup back into the pan and add more sugar. 1/4 c. or so and heat once more until it is a hot syrup consistency. Only pour and heat one jar at a time if you used different colors of syrup. Roll the sticky skewers in sugar and add once more to the jar after the syrup has cooled down.
Can you re-use rock candy syrup to make more crystals?
Should You Cover Your Rock Candy Jars?
Here’s are a few more tips for making homemade rock candy:
- Make sure your glass/jars are clear and CLEAN.
- Make sure your water/ sugar ratio is AT LEAST 1:2- just shy of a 1:3. You want a thick, saturated sugar syrup mixture.
- Place in a WARM, SUNNY location if you’d like to grow crystals quicker. They will be smaller crystals. If you want larger crystals, place it in a place away from direct sunlight. Our crystals are small because we grow ours on a windowsill. We like seeing the light shine through the glass and watching the crystals grow.

Welcome! I'm Brandy, mother to 5 darling kiddos and a cute black lab named Toby. My husband is in the Coast Guard so we've lived all over the place, turning each house into a home. I love baking, sewing, making cute things with my kids, and sharing what I've learned with all of you!
What a neat idea. I vaguely remember making sugar crystals on string like this in science class back in the day… skewers are way better for eating it though!
I have been wanting to do Rock Candy! Thank goodness you did a post, it reminded me and your tutorial looks simple enough 🙂
I was seriously about to search for this so I could make some teacher gifts that said “You Rock!” Thanks for the tutorial!
I have to try this! What a fun idea and the kids probably loved watching it. I wonder if we get enough warm sunlight in our house in the canyon. I will be sharing this on my facebook page and pinning this idea!
Wow! What a lovely project – we are going to try this!!!! Thanks for sharing 🙂
Totally awesome! I can’t wait to make this with my kids!!!
How fun!! I can’t wait to make these. 🙂 Thanks for sharing.
Sweet welcome to this link party – http://ivanna.blog.com/linkparty01/ ). And happy crafting ).
Hi, I just came from Tutorial Tuesday. This is such a great tutorial. My mom would love making this with my sons.
I’m now following you. Please stop by when you have a chance and join us. We have fun crafts and some are eco-friendly.
I love rock candy! I really need to do this again with the kids. Thanks for the reminder!
LOVE it!!! absolutely love it!
thanks for posting to Tip Junkie!
Shannon
Sweet Stella’s
my little girl was sitting beside me when this picture came up, she said, “yummy, we should try that!” thanks for the inspiration! I started a link party at my blog and I’d love for you to link this up. If you’re interested it’s http://caribbeanmissionarywife.blogspot.com/ Have a lovely day, Maria
LOVE THIS! I can not wait to mske these!!! Thank you for the tutorial!
Have a pretty day!
Kristin
I just came from Tutorial Tuesday. And is such a great tutorial. My mother and I make this before two days with different colours. We are thinking to include this for kids party.
hediyelik eşya
oh i love this idea. I might need to make these for my upcoming halloween party!
What a great thing to make! Can’t wait to try this with my kids – they’ll love it!
Visiting from Somewhat Simple. Following you now. 🙂
I remember doing this with my brothers when we were in middle school. We never thought of coloring it! I should make these with the kids. You know my girl is the sugar addict. 🙂
thanks for sharing I shared link on my blog http://shopannies.blogspot.com
awesome, love the colors!!
Thanks so much for sharing, my daughter’s birthday is coming up and I hope I can try to make these! I featured them on my Friday 5! Have a great weekend!
This is awesome! I was wondering how to make rock candy. Thanks so much for sharing the recipe and process.
Pinned on pinterest. 🙂
Cheers,
Tracy Screaming Sardine
Looks delish!
Would be fun to make with my 6 year old!
Never thought of making these at home! Thanks so much for sharing! 🙂 Great idea!
Katelyn
Ooooo… thanks for sharing! It’s been forever since I’ve thought about rock candy! Might have to make some now 🙂
I love this so much I featured it this week at my Hookin Up with HoH Party!
Feel free to stop by and grab a button if you’d like!!
xoxo
Allison @ House of Hepworths
I love this so much I featured it this week at my Hookin Up with HoH Party!
Feel free to stop by and grab a button if you’d like!!
xoxo
Allison @ House of Hepworths
This is great! I’ve looked into buying these for a party and I think making them would be much cheaper and the plus is that this would be a great science lesson for my son – delicious and educational; the best of both worlds…LOL! Thanks for this post! (coming to you from Nifty-Thrifty linky party)
What a great tutorial! I’ve featured this project as part of Simple Crafter’s Simple Craft Tutorials for this week. 🙂 http://www.simplecrafter.com
What a sharp idea.. love it..Awesome blog,,Im officially following ya with smiles.. Found ya on linky and had to stop in.. So much creativity dwells here.. Im Marilyn via http://theartsygirlconnection.blogspot.com ..Hope you can stop in sometime..TY
This is going to sound stupid, I’m sure, but would flavor extracts work with this? I’d love to make flavored rock candy!
Extracts are what I use!
I’m with Damienne…and would adding alcohol work for adult versions? I can see myself eating these, drinking an adult bev of some sort and trying to knit!
I LOVE this idea! I’m taking my kids to Disneyland in December and want to make all the treats we eat there this time instead of spending so much $$ buying it all. This is one we’ll be making…and doing it together.
Thanks for sharing!
Mischa
http://barelykeepingittogether.blogspot.com/
This is amazing. Can you heat up the leftover syrup and start re-use it?
-Rebecca
@Rebecca, I’m not sure, but I don’t see why not! As long as it is still a thick sugary syrup mixture again when it’s heated up again I would think it would work!
@Damienne, yes you can! I just didn’t have any!
Have a great week ladies!
Brandy
Gluesticks
This is AWESOME!! I’ve always loved rock candy and so do my two boys!! We are so doing this and SOON!! Thanks!! 🙂
This is such a cool idea! I can’t wait to enjoy this with my kids!
I wonder, could you use kool aid to color and flavor the sugar water?? Just a thought?
Thank you so very much for the reminder! I think the last time I made these was over 10 years ago. We didn’t dip the skewers in sugar first so there was some coverage issues. We did make them in clear plastic containers so we could easy break any lingering crystals out and then reheated them and the syrup to make more rock candy. Once again thank you for the reminder! I know what we are going to be making for the cousins for christmas!!
Does anyone know if you *have* to use the wooden skewers? I have some of the paper-ish lollipop sticks on hand and wonder if those would work?
I used your instructions, and we’re on day 3 with no crystals forming on the sticks. What do you think I did wrong?
Mama B- I’m not sure. I’ve just always seend them int he stores with wooden skewers. Good luck!
Mama-tbull- Oh no! I’m not sure what went wrong. As long as they are in a warm sunny location and there is at least a 2 to 1 sugar/water ratio, I’m not sure what else could have gone wrong. Was there a good coating of sugar on the skewers so that the crystals had something to grow on?I wish I could help more. Give it a few more days before throwing in the towel.
wonder if you could use unsweetened koolaid pkts and that would give you color and flavor at the same time?
I love the unsweetened koolaid idea!!
This comment has been removed by the author.
Can I use another type of sugar say honey?
Thanks!
Hi Wendi!
I honestly have no idea. Sorry that I am not much help. Maybe you can find another recipe online that does this. I know that honey crystalizes in the container after awhile. But I really haven’t thought too much about it.
Have a great week!
Brandy
WE ARE MAKING this, but not to eat, it will be the stalgitie in our cavern project
Great tutorial. I can’t wait to try it out. Thanks!
Ok, I’m trying this… unsuccessfully. So did you wait until your solution was cool before you put your skewers in? The sugar dried onto my skewers is just dissolving into my solution. 🙁 How long did you “dry” your skewers with sugar on them?
Stevie, I only let the sugar cool 10-15 minutes or so before adding the sticks. Some of the sugar will dissolve off of the sticks, but it should still give it enough of a base. How long has it been since you dipped them? Was it today? Or a couple of days ago. If it was today, I’d give it 24 hours and see what happens tomorrow. I think you’ll be surprised and see some progress. Let me know!
Oh, and as far as how long I dried my skewers that had been dipped in sugar. Just long enough so that they are DRY. Not moist at all. I dipped them first, then created the syrup mixture, then waited the 10 mintues or so for the mixture to cool before putting them in the syrup. By that time they were dry. Good luck!
Love this post! I remember eating these on special occasions when I was a kid. I had to share this with my Eljah*B fans
https://www.facebook.com/pages/EljahB/163991400290778
Thanks for your great blog!
Can’t wait to try this. Thanks so much for sharing 🙂
Love the idea!!
Silly question: can I use the syrup in the jars again to make more? Thanks!
Hi Cecelia,
I’m not sure why you couldn’t re-use it. It’s pretty much a simple syrup, but I have not tried to do so and am not sure how long it would stay good for.
Brandy
How did they taste? 🙂
I am also having problems getting anywhere. My syrup is between a 2:1 and a 3:1 (Sugar:water)
I used wooden skewers and mason jars. I let the dipped sticks dry by a fan for an hour… Do you think the syrup might have been to cool when I set the skewers? It’s day three and all the sugar as dissolved and no crystals on the sticks or the bottom. I am willing to try and tips you may have 😉
Borders Family,
I sounds like you did it right. I don’t think it was too cool. It should have been fine, but I’ve had to warm up my sugar again before and add more sugar to help jump start the process even when the previous time I made it, it worked out fine with the same sugar/water ratio. So I don’t know what mades it sometimes work and another time need more sugar. Just reheat your syrup and add more sugar (the same method you did before….stirring until dissolving and can’t disolve anymore) and keep it in a sunny location.
Just pull your skewers out and roll them in sugar while you reheat your syrup. They should be ok to stick back in as long as they are thick and dry.
I am so sorry that it hasn’t worked out for you yet, but it will!
Can you cover the jars? I don’t want any flying critters getting crystalized in the grandbabies’ snacks …
Hi Bernadette, I haven’t tried covering mine before so I’m not sure. Sorry! But I understand what you mean. The summer is the perfect time to do rock candy in a warm window, but is also the perfect time for bugs…
I’m selling the ball end sticks that are used to make rock candy. They are SO HARD TO FIND!!!! Anyone needs them can contact me at [email protected]
Hello there, thanks for the post. Our family is doing this for our summer bucket list!
Just an observation: folks don’t hold yourself to any particular timeline. We didn’t start to see crystals forming until about day 7. Here we are at day 14 and we pulled one out and it is similar to the smaller one pictured. We have decided to wait another week to see what more we can get.
I knew we had something within the first three days though, because crystals started forming in the top water line and at the bottom of the glass. If you don’t have these crystals within the first 4-5 days, you probably need more sugar.
I covered the tops loosely with cupcake liners. I just slipped them over the top through a small hole in the bottom. I too was worried about critters. It also stopped prying eyes from trying to touch.
Love this! I remember doing this when I was a child. 🙂 Megan
Love this! I remember doing this when I was a child. 🙂 Megan
I wonder how well it would work to use koolaid powder as flavoring& coloring
Brilliant idea – hoping to give this one a go this holiday.
I have a question! I would like to make these for my daughter’s winter wonderland birthday party, but I’m worried it might be too cold now. We have only north-facing windows in our apartment with no direct sunlight. Would there be enough light that way, or would it be too cold for the crystals to grow in our window sill? We’re in MN and temps have been between 20-40 most days.
Hi Aryn! I honestly have no clue since I have only made it in the summmer/early fall. Sorry I couldn’t be of much help :/
Totally Awesome
Wow! A classic boiled sweets recipe!
They look fabulous, good job!
This comment has been removed by a blog administrator.
I made these, they seem to have turned out fine- except for the fact they are completely stuck to the bottom on the jars! I atacked a couple with a knife and ate a small peice. Is there any way to get the lumps out without melting the whole lot?
Oh no! The sticks may have been a bit too close to the bottom of the jar, but it sounds like they grew a decent size for you! I’m not sure how to break them out without breaking the candy. Ours didn’t hit the bottom. Crystals grew along the bottom, but they weren’t attached to the wooden stick. I’m so sorry!
It’s not too terrible, two candies came out perfectly, another one fell apart and the last 2 are stuck. I’ll try holding them over steaming water and hoping they come out all right. The broken pieces I managed to chip out are so pretty and sparkly, I love looking at them in the light before eating them haha
What if I used way too much sugar and after a day it looks almost solid?
Hmm…I’m not sure. If after another day or two you don’t see any growth, you might try pouring it back in a pan, add a bit if of water to dilute it and reheat it to make the syrup again. I’d just hate to see it go to waste! I would still wait at least a day though.
What an awesome experiment/recipe to try with my kids! I’m curious… Has anyone tried flavoring their syrup with any sort of extracts? I would love to try it, just not sure how much to use. I guess that’s why it’s an “experiment”! 🙂
So many people have mentioned flavoring it, but haven’t reported back to say if they’ve tried it or not! I don’t see why it wouldn’t work! Maybe try different amounts in each glass! Have a great week!
We used food flavoring that we bought from getsuckereddotcom and it tastes amazing! Our personal favorite was Blue Raspberry 😀
Great tip, thanks!!
i love candies http://www.tollywoodpolitics.com
I love this activity. I have 3 daughters and we made this one of the nights events during a 12 girl sleep over. I used the smaller mason jars and labeled each jar with the girls names. I did a test 2 weeks before and found that you really need to have a very good sugar base started on each stick to get the best results. We used the solid food coloring and hard candy flavoring. To help with keeping the bugs away I used some of those outdoor pop up nets you use for outdoor dinners over your plates. The girls loved that they got to see a progress report every evening on their Instagrams. Day seven they were all over after school to collect their rock candy. Thank you
3 drops of flavoring is perfect for each jar.
Wonderful! Thank you so much for sharing your experience with making rock candy! And THANK YOU for giving us the right ratio for flavorings. I’ve had several readers ask about flavoring the candy, but I’ve only made it with straight sugar for my kids.
Your welcome. 🙂
This comment has been removed by the author.
This comment has been removed by the author.
Hey!! Thanks for sharing with us…it was really nice…London Czech escort Erica provides escort services in Knightsbridge. Click Here
Just a thought, it seems like the darker colors did better. Maybe attracted more sunlight. Yellow and pink seem to be smallest and are also the most translucent.
That is interesting and did seem to be the case with ours!
How would you go about adding flavor please?
Wilma,
I would just add a few drops of flavoring to each jar/glass before putting in your stick.
oh my goodness. It’s like you were reading my mind! I came to your blog today, specifically looking for this exact post! I’m totally weirded out.
That’s funny! Stacy and I do things like this all the time. It must be the Whitaker genes 🙂
adult candy
We tried several years ago to make rock candy without success. We’ll give it a try with your recipe.
We tried several years ago to make rock candy without success. We’ll give it a try with your recipe.
If you are having problems making the rock candy, here is a tip that might help.
Unlike the article says, warm, humid areas do not help the crystals form at all! Heat evaporates the water, yes, driving the sugar to crash out of the solution (LeChatelier’s principle). This cannot happen in humid environments. The sugar solution in a warm environment won’t always come out stuck to the stick like you want it to though. In order to make the sugar crash out into the nice cubic pattern stuck to the stick, you want to get the stick in the syrup solution while it is still warm/hot, then immediately store in a cool, dry place. A warm place will cause the sugar to not want to join the crystalline structure on the stick and might not even cause any sugar to come out of solution (warm liquids can hold more solute).
Background: Master’s degree in Organic Chemistry, where crashing compounds out of solutions is common practice.
smart idea and im sure it tastes good imma do it in class for an expirement!!!!!!!!!!!!! XP
😛
We used to do this when I was a kid, but instead of skewers we used string.
My son is making some for cubscouts right now with string! Works the same! 🙂
We put our skewers through unbleached coffee filters to keep the dust and pet hair out of our jars but allow for evaporation. It seemed to work well. Also, when we made this during a high humidity period it was a complete failure (but still fun.)
Just curious but….my daughter and I are using this as her science project and after one day the glasses looked a little odd. We did three glasses and the surface all have the crystals on top but none on the actual candy sticks. Is that normal? Are we doing this right? We made sure to saturate and roll them in sugar but the sugar base has come off in the water. Please help!
Ours did that too! I don’t think we noticed crystals until growing until day 3 or so. By day 7 we almost had to chip the top layer a bit to pull the sticks out. We’ve made this and had it fail too. If by day 3 (4 at the latest) you don’t see any growth, go ahead and heat the syrup up and try again. The fact that your syrup is hardening a bit is a good sign that you used enough sugar. I know you can make it with string too instead of wooden skewers. I’m not sure about the lollipop sticks. Good luck! 🙂
After going back and rereading through the process and materials, I wonder if we shouldn’t have used the sticks we did. It looks like you guys used wood instead of the candy sticks (like the type you would use for cake pops). I wonder if that makes any difference. Maybe if we don’t see any growth after three days we will start over using kabob skewers in hopes it will work better.
I remember doing this in science class when i was a kid and the ratio was 500 ml of water to 5 lbs of sugar.. This is crazy that i remember this cause im 48 yrs old.. wow how the mind works..LOL
Haha, we remember what is important, right? I never made it as a kid, but had a great time making it as an adult…I just didn’t care to eat it. It was fun to watch grow 🙂
We tried several years ago to make rock candy without success. We’ll give it a try with your recipe.
how many does this make at one time? thank you.
Hi Donna, we used 8 glass cups and were able to get 10 rock candy sticks from those. If you have wide jars you can get two from each jar, but ours were skinny glass cups and the ones that made two were really small. I would stick with 1 stick per glass or small jar.
Well I have to ask because i haven’t seen anything about it. What to do when they come out if the jar? They are dripping syrup! I don’t want my daughter eating them like that as it causes too much of a mess. Should I pat with paper towels? The syrup is so thick I don’t know that paper towels with soak it up.
Hi Cynthia! I held the lollipop over the jar to let most of it drip off and then set it on a cookie sheet to dry. You can also leave the clothespin on and just transfer it to an empty jar to let the excess drip off and let the lollipop dry. I will add this to the post in case anyone else is wondering too!
my is growing out of control all over the glass but it wont grow on the skewer can you please help????
Hi austin! I would just recommend taking your sticks out, rolling them in sugar and adding them back. Hopefully the sugar will give the syrup something to stick to. The fact that the crystals are growing on the glass means that your syrup is at a good saturation and so the only other thing I can think of is the sticks. Good luck!
How awesome! Ive always wanted to make these on a stick! I have a question that may have already been asked! Sorry! Once one stick is done growing, is the jar of syrup still good to make another one?
Hi Heather! After 5-7 days, there are crystals growing on the bottom of the glass too. I also found this online that said “Rock candy is formed because the solution is “supersaturated” with sugar. Once it forms, the syrup is not supersaturated anymore and will not make more rock candy unless more sugar is again dissolved in it.” Hope that helps!
Question, can the solution be used over again if boiled again and a new stick or string put in?
Hi Emma! I haven’t tried reusing the solution before because mine usually grow solid crystals on the bottom and sides of the glass as well, but from what I have read from other sites you can reuse the solution if it has been reheated. If it has a slight cloudy look the sugar is still saturated in the syrup. If it looks completely clear, add a little more sugar. Good luck!
The most important part is the temperature it boils at, Just 50 degrees off can give you a flexible candy instead of a hard one.
Do you think this would work with something like coconut sugar or stivia?
Hi Jamie! I honestly don’t know. I’m sorry I couldn’t be of more help! I’m not sure how they compare to sugar. I know you can substitute when baking, but am not sure for things like this.
I want to make the solution and provide the pegs and sticks as party favours…will it be fine if sticks are dipped into solution a day or two later?
I would think that would be absolutely fine!
Can jello be used for color and flavoring. Of course not a full pkg. I have some dry jello left over from a recipe i tried that completely didnt work. But i dont want to throw it out. But not able to make jello from due to the difference in how much is left.
This would also allow me to give some unique flavors without having to go out anc buy different flavorings.
Hi Angie! I’ve never thought of using Jello before. Honestly, I’m not sure!