If you’ve ever been intimidated by making stockings for you family, this is the pattern for you! I created 6 stockings for our family for $8. Made out of cotton and felt, you can whip up a scalloped stocking using our tutorial in no time!Â


If you’re looking for fancier version of our matching family stockings check out our quilted stocking pattern.
So I got an idea….last week, and I am not one who can procrastinate. So once I had the idea it was just killing me not to finish it out! Now that Ruby is here it was time for nice matching stockings for the whole family. I decided to make my own because I wanted them be pretty, sturdy, and inexpensive.
For an added touch I sewed strips of fabric together to get the quilted look for front piece, but you can save time by using a solid piece of fabric. The front of each stocking is cotton fabric and the back is felt. Easy to sew with, and a natural stabilizer without adding batting or interfacing. These stockings are sturdy and ready to be filled with all sorts of goodies.
More Christmas Sewing Projects
Christmas Memory QuiltWinterberry Pinwheel Quilt25 Christmas Sewing Projects
from Crazy Little Projects
Scalloped Stocking Tutorial

Scalloped Stocking Tutorial
If you've ever been intimidated by making stockings for you family, this is the pattern for you! Made out of cotton and felt, you can whip up a scalloped stocking using our tutorial in no time!
Cost: $2
Equipment
- sewing machine
- scissors
- pins
- pen or pencil
Materials
- old stocking
- paper newspaper or craft paper
- felt
- cotton fabric
Instructions
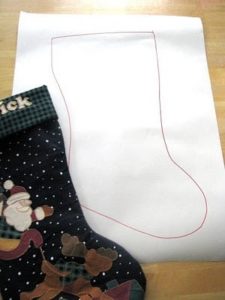
- To create a pattern, I trace around an old stocking our onto craft or newspaper.
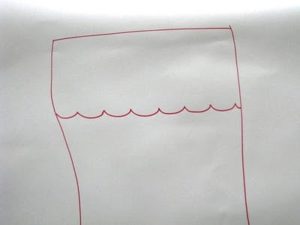
- Draw a simple freehand drawing about 5" down across the stocking for a scallop pattern (you will use this later).
- You will need 2 stocking pieces of felt cut out from your pattern, and 1 piece of fabric for a total of 3.

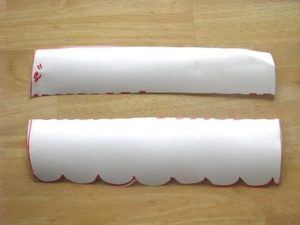
- Cut out the scallop pattern and use it to cut 2 pieces of felt for each stocking. Yes, 2 pieces of scalloped trim for each stocking. One piece isn't thick enough, so you will stack them together. Sew the scallop piece along the bottom (scalloped) portion.
- Go back to the scalloped pattern piece and cut out the top 2". This will be your pattern for the stocking trim.
- Lay the scalloped felt piece flush with 1 felt stocking piece and the cotton piece.
- Fold trim piece in half and press. Open it up and press each side in towards the center fold.
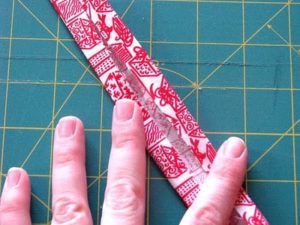
- Press again.
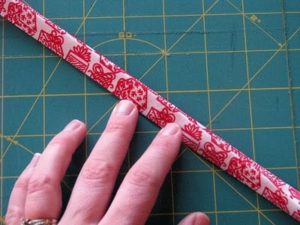
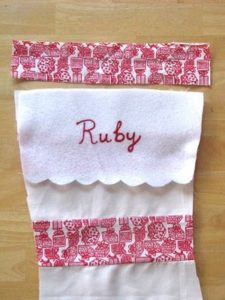
- Pin the trim across the top edge, creating a sandwich of fabric (bottom layer is felt, middle layer is cotton, and top layer is felt scallop piece) Stitch across.
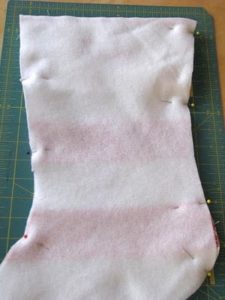
- Then add the 2nd piece of stocking felt on top, pinning around 3 sides and leaving the top open. Stitch around, clipping corners. Turn it right side out.
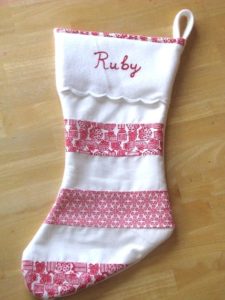
- Using some remaining fabric or felt scraps, cut a 2.5"x8" strip and press and stitch in the same manner that you did for the stocking trim. Fold in half and machine stitch it into place, about 1" down from the top edge.
Notes
Note: to add lettering, hand stitch the names or add using puffy paint. I used puffy paint and freehanded the names the night before I sewed my stockings together.
Adding names to the stockings: I free handed these and had pretty good luck getting them all right in one shot. If you’d like to hand stitch, use a sewing pen or pencil to free hand the names, then embroider over the pencil sketch. This is what I did for our quilted family stockings.

Welcome! I'm Brandy, mother to 5 darling kiddos and a cute black lab named Toby. My husband is in the Coast Guard so we've lived all over the place, turning each house into a home. I love baking, sewing, making cute things with my kids, and sharing what I've learned with all of you!
you did a great job on the stockings. They look so cute and happy hanging on your mantle.
Very cute!
You have such talent! Beautiful stockings!!!!
Thanks for your tooth pillow post. I made one last night for Mia. I added rosy cheeks to it with my mousse blush. CUTE.
Love, bree
Adorable!
You did a wonderful job of creating your own socks. They are so pretty and I love the scallops.
This is too cute!!!
Oh man…I’ve never wished I could sew like I do now! Those stocking are darling, thank you so much for sharing!!
These are great looking stockings! I wish I could sew! Im visiting from TT&J
Brandy,
Your stockings are so cute!!!
I wanted to stop by, and let you know that I’m having to put my Soda Parlor on Private for awhile. I would love for you to still come and visit. Please email me at [email protected] and so I get your email address to send you an invitation.
Thanks,
Jacque
http://thesodaparlor.blogspot.com
You did a great job! They came out so nice. New follower here. Would love it if you would stop by and share this at my linky party going on right now 🙂 http://everything-underthemoon.blogspot.com/2011/12/bedazzle-me-monday-11.html
Have a great week!!
Boy, you are amazing-so crafty and co creative! These stockings are gorgeous. I am loving all of your wonderful Christmas ideas!
I have just posted about Christmas stockings on my Christmas blog. Please pop by if you have 5 minutes to spare!
Best Christmas wishes,
Natasha.
These are sooo cute! Thanks for the great tutorial 🙂